It's crazy to think that in just the past two decades, helmet usage for skiing and snowboarding jumped from 25% to 90%. That's one statistic worth celebrating, but even though wearing a helmet is ubiquitous today, not everyone is wearing a helmet that fits them. So, how should ski and snowboard helmets fit then?
Ski and snowboard helmets that fit properly will lay flush to the head while feeling snug but comfortable. Helmets that fit improperly will move independently of the head during wear; yet helmets that fit correctly move in unison with the head, even while unbuckled and unadjusted.
The "head shake" test, as it's so creatively titled, is one of the three steps that every skier and snowboarder should know when looking for a helmet that fits properly. Let's dig into each.
3 Steps For A Perfect-Fitting Ski or Snowboard Helmet
You might be surprised (or maybe not) at how many people start and end their search for a helmet with style and color coordination on their minds.
Rarely taking fit and safety into consideration, which as you guessed, should be the top priority.
And sure, to some extent looking fashionable should be a factor, but certainly not the deciding factor.
It's never been easier to find a helmet that fits perfectly and looks great. While picking the color and design is your decision alone, here are three steps to help your decision on fit.
1. Size and Shape
Even if you know your helmet size, but are looking for a new helmet - it's always a good idea to perform the following steps. Like all things in the ski and snowboard world, every manufacturer has a different definition of size, and even within the same brand, you might have different sizing.
How Do You Know If Your Ski or Snowboard Helmet Fits?
When you put the helmet on your head, you should feel air pump out of the vents and the sides of your head. That's a good sign. If not, move on to the next size or try a different model altogether.
Also, don't sleep on the importance of a helmet's vents - this works wonders for releasing the buildup of heat, and ultimately keeping you comfortable.
Perform the Shake Test
Once you've found the right size, it's time for the head shake test. This is where you'll know if the helmet is snug enough and will stay in place during an emergency.
Put the helmet on, but don't buckle the chin strap. Then start to shake your head side-to-side, or if you want to get into character, maybe do a more gentle version of head-banging in a mosh pit.
Bad jokes aside, if the helmet moves independently of your head, it's too loose.
What does moving independently mean though? If you feel the helmet rub across your hair or wiggle in and out of the position you started in, that's "independent" movement.
If you're looking in a mirror, a loose-fitting helmet will lag behind the movement of your head.
A helmet that fits your head just right won't shift when you shake your head - it moves exactly as your head does and doesn't rub the top of your head in the process.
Also, if you feel like the helmet is compressing your head, or just uncomfortable, but it doesn't move independently, that most likely means it's not a great fit.
You should still be comfortable. And if this is you, size up just a bit, or double-check that any adjustments on the back of your helmet haven't been set.
Just a reminder that this whole part of the test is conducted without fastening the chin strap. That's up next.
2. Adjust Chin Strap and Fit Adjustment System
After you've found the right-sized helmet and tried the head shake test, it's time to put the finishing touches on your perfect fit - and it's all about minor adjustments for safety and comfort.
This is a two-for-one - adjusting both the chin strap and fit adjustment system (if applicable).
First, let's deal with the chin strap because if that's not tight enough, nothing else matters.
Adjusting the Chin Strap
Put the helmet on, but before you buckle the chin strap, grab the two ends of the strap and give them a quick tug - get any slack out of the of straps, and tighten so that there's no play.
You shouldn't have to yank hard to get rid of all the slack - just a gentle tug should do it.
Now that the chin strap is where it needs to be, go ahead and buckle it. It should pull so that the strap is resting where your throat and chin meet.
And you also shouldn't feel like the strap is choking you. If you do, it's too tight and you need to loosen it up a bit.
If you can't fit one finger between your chin/neck and the strap, it's too tight. If you can fit more than two fingers between the strap and your chin/neck, it's too loose.
Once the chin strap is in place, you might notice that your helmet has shifted a little on your head. If it has, there's a good chance it needs to be adjusted using the fit adjustment system, which goes by a million names.
Adjusting the Fit System
Most helmets, but not all, have some form of a dial, ratchet, or slider on the back that, pulls the helmet closer to your head, or in some cases, allows the helmet to "hug" the contours of your head better.
Some of the adjustments you'll make with this fall into preference, but this is most helpful with clothing, like a buff that rides high.
Or maybe you're having a crazy hair day or you grew your hair out in the off-season, this is a way to accommodate that.
If your helmet has a fit system, adjust it until the helmet feels snug from all angles - front to back, and side to side.
You shouldn't feel any pressure points. The helmet should just feel like it's gently resting on your head without being too loose or too tight.
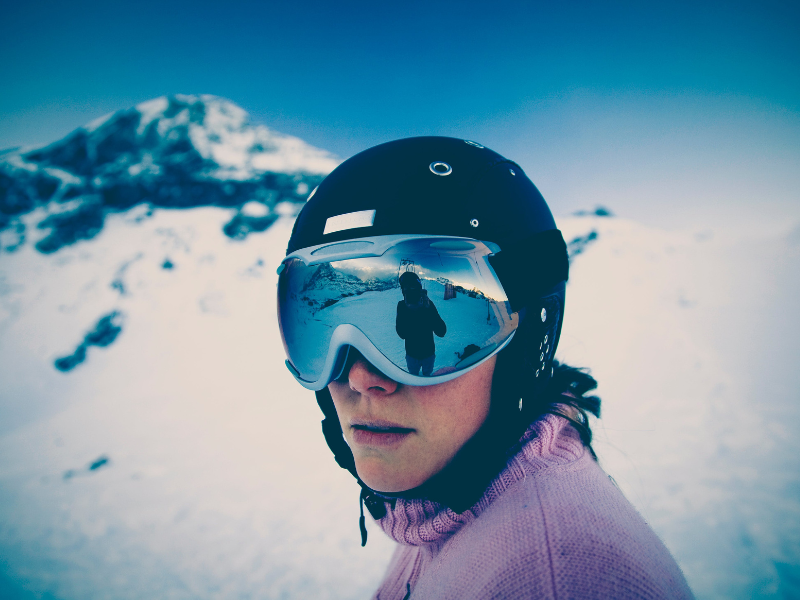
3. Check the Fit of Your Goggles
Not all goggles are compatible with helmets, and if you force the issue, you could compromise the effectiveness of your helmet for safety, or best case, have an uncomfortable ride.
Take into account your goggles - bring them to the store with you, or if you're ordering online, read up on compatibility.
With that in mind, there are two things you need to check for now; the gaper gap and the space on the sides.
What is Gaper Gap?
Gaper gap is a nickname for the unwanted space created between the top of goggles and a ski or snowboard helmet. It's a sign that a helmet doesn't fit properly, possibly too loose, or that the goggles are not fitting properly to the helmet.
You want the space to be completely flush (or incredibly close to that), where the goggles aren't pushing into the helmet, but also are pulling away to create a gap. Just nicely budding next to one another.
And don't forget, that gap also can leave a nice windburn or sunburn market - which doesn't help with any cool points. And jokes aside, it also is a way to protect against frostbite - a very real danger to any exposed skin.
There's an old, but funny and effective campaign called "Erase the Space" that's an easy way to remember this point of fitting.
You may just need to adjust the fit system or goggle strap, but an unfortunate culprit sometimes is that you may have incompatible goggles and helmets.
If you need new goggles, get them at the same time as your helmet to make sure it's a good fit.
As previously mentioned, if you already have goggles, take them into the store with you when you purchase a helmet. It's not weird - and a smart way to navigate this.
What is weird is having gaper gap.
A helmet that's compatible with goggles will fit snugly to the helmet, and in some cases, have a little notch that the helmet's brim fits into, to further eliminate any unwanted space.
Space on the Sides
You've got your helmet on, and your goggles on, and no gaper gap in sight. Now for the final boss of helmet fits; space on the sides.
Ideally, just like a gaper gap, you want to have little to no space between the sides of your lens and helmet.
But if that's not the case, here's a test you can run.
Take each of your index fingers, and place them in the space between the sides of your goggles and your helmet.
If it's a loose fit or you could get anything more than one finger in that space, you most likely have the wrong goggles/helmet combo.
That may be bad news to hear, but it's way better to know now than to deal with some of the outcomes.
This can cause problems with peripheral vision and impair safety. It's important to check your field of vision with both your helmet and goggles on - you can appreciate how dangerous restricted vision would be on the slopes.
The Right Fit Comfortably Reduces Gaps
It might seem like there's a lot to think about to get a helmet that fits as it should, but the overarching concept is simple: minimize gaps between your head/face and your gear (helmet and goggles) while still feeling comfortable.
You now know that a ski or snowboard helmet fits well, moves with, and conforms to the shape of your head. It's inherently flexible, able to make adjustments like closing the gap between the nape of your neck and the helmet, while the chin strap can tighten to the proper location of your chin and neck. And finally, your goggles and helmet system work together, reducing any vulnerabilities to the effectiveness of your helmet, or your vision.
And even if that still feels like a lot to think about when you're getting a ski or snowboard helmet, if you take the time and follow the three steps to find one that fits well, it'll be worth it.